
Building a home studio for voiceovers in 2025 has never been easier and more budget-friendly! For years, professional audio equipment was considered out of reach, and the idea of achieving broadcast-quality audio was overwhelming. This is not the case anymore. Today, with a minimal budget and a few simple guidelines, you can achieve industry-standard audio from the comfort of your home office. In this article, you will learn how to do voiceovers at home, in a simple and efficient manner without spending tons of money!
to eliminate outside noise and get a sound-treated environment.
Today, we will discuss the benefits of having your own home studio for voiceovers, and the step-by-step process of recording broadcast quality audio. There could be various reasons as to why you’d want to set up your own sound booth at home. Here’s a quick list to get your thinking hat on:
Benefits of a home voiceover studio
- A quick turnaround for remote auditions
- Professional audio quality without breaking the bank
- Makes you accessible to the international market
- YouTubers and other content creators may benefit greatly from this setup.
- You are perceived as an expert, even with basic audio editing skills.
Although it’s true that the more you invest in audio equipment, the better, it is also true that the scope for investment can be endless. Therefore—just like any other small business—I recommend that we take small steps and build gradually. To begin with, for the purpose of this project our focus will be on making a budget home studio.
What will you need for this project?
Well, first things first, we’ll discuss the necessary gear and equipment. Moreover, we’ll discuss how to select them, and look at the various options that are available. On the other hand, if you have a computer and need a basic VO setup, then check out the total cost of a bare-bones basic VO setup.
However, if you’d like to explore and see what other options are available, then let’s jump into it!
Voiceover Studio Shopping List!
- Computer/laptop
- Microphone
- XLR Cable
- Pop Filter/Pop Shield
- Shock Mount
- Mic Stand
- Headphones
- Audio Interface
- Software [DAW]
- A Quiet Space/Closet
Let’s take a look at the list above and our options for each one of them!
If you have the equipment and want to connect them, then jump to the next section. CLICK HERE!
Computer/laptop
A computer or laptop is probably the most expensive equipment you will be investing in, especially in the beginning. I’d be glad to geek out on this one, but for now, let’s stick to what we need for this project.
If you have a computer that runs Microsoft Windows 10+ and an Office suite or a Mac that’s equally capable, then you already have a PC that can record voiceovers.
This configuration is enough to get you started with a free software called Audacity, which isn’t a very heavy application, and neither is it expensive. If you don’t have a computer and are planning to buy one, below are the desktop or laptop options to consider.
Desktop
Processor: Intel Core i3
RAM: 4-8 GB
Hard Drive: 500 GB
Monitor: 17-21 inches
Price: Rs 40,000/- to Rs 55,000/-
[US $450 to US $650]
Laptop
Processor: Intel Core i3-i5
RAM: 8-12 GB
Hard Drive: 500 GB – 1 TB
Screen: 14-15 inches
Price: 50,000/- to 70,000/-
[US $580 to US $800]
*These prices include the motherboard, CPU cabinet, keyboard, & mouse*
There are laptops available for a much lesser price. However, if mobility is not a priority and you don’t mind having a workstation, a desktop PC will give you a better bang for the buck in terms of power, performance, ease of use and storage. Also, the overall recording and the storage experience are far better. Finally, factor in the aspect of storage space—WAV files are bigger as compared to MP3.
Hard Drive Space!
Although you’d be sending out MP3 files to clients, editing is largely done on WAV files. With regular practice and increasing VO work, hard drives can fill up quickly, so it’s better to have sufficient hard drive space before you start recording!
Microphone
When it comes to voiceovers, there are largely two types of microphones to choose from: condenser and dynamic. There is also a USB-type mic that has a built-in interface [see picture below]. Before we move on, let me say that, as a beginner, the best microphone is the one you already have. Really, thinking about which microphone or gear to buy will literally send you down a procrastination spiral. Nonetheless, it’s worth exploring different types of microphones, for future reference, and to understand how they are different from one another.
Condenser Microphone
A condenser mic is the ideal choice for professional voiceovers and dubbing studios, because it captures most audio frequencies, which means that it comes pretty close to true-to-life sound. It requires an audio interface to work with a computer, which adds to the total cost, making it a slightly more expensive option. Price Range: Rs 7000/- [US $80] to about Rs 15000. [US $175].
so an external audio interface is required.
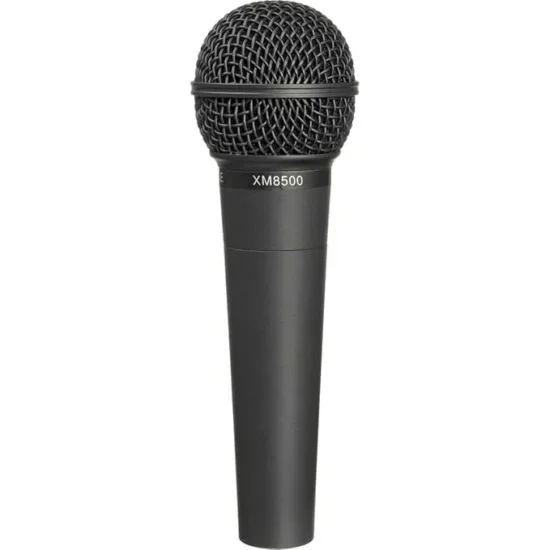
Dynamic Microphone
Often referred to as a stage mic, a dynamic microphone cancels out the ambient sound, but again, you need to be really close for the mic to capture your voice. There is no doubt that it is a much cheaper option, since you can plug it directly into your computer’s on-board sound card/port. Nonetheless, here’s the tradeoff: it requires more gain, and also, the post-processing and editing can be a bit challenging. Price Range: Rs 2000/- [US $23] to about Rs 9000. [US $100].
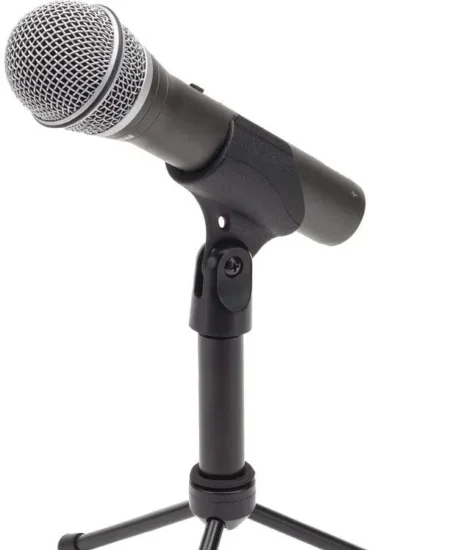
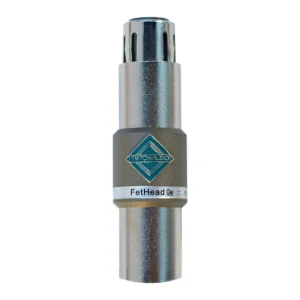
NOTE: Since the gain is too low and you need an amplification in the audio signal from the audio interface, you will need a FetHead, a device that acts as a bridge between the dynamic microphone and the audio interface, where you can switch on the phantom power without frying the microphone.
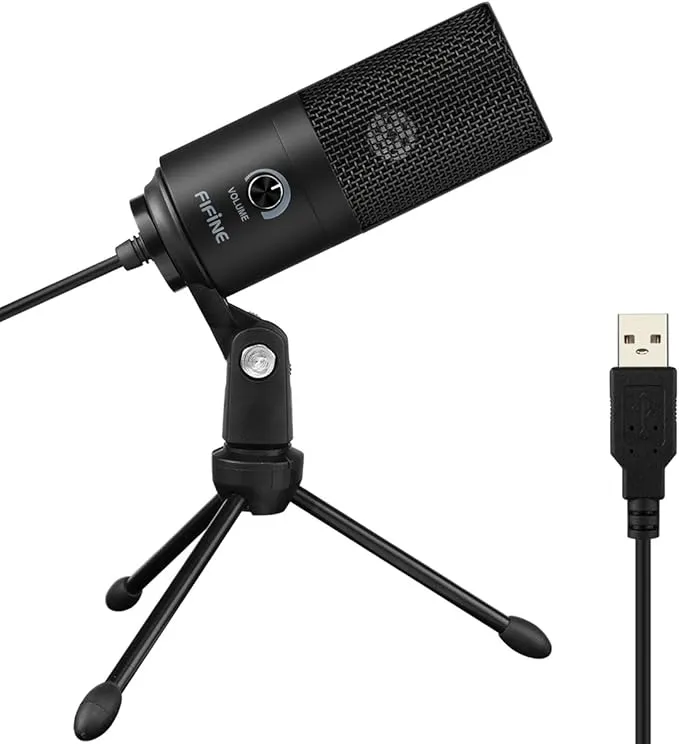
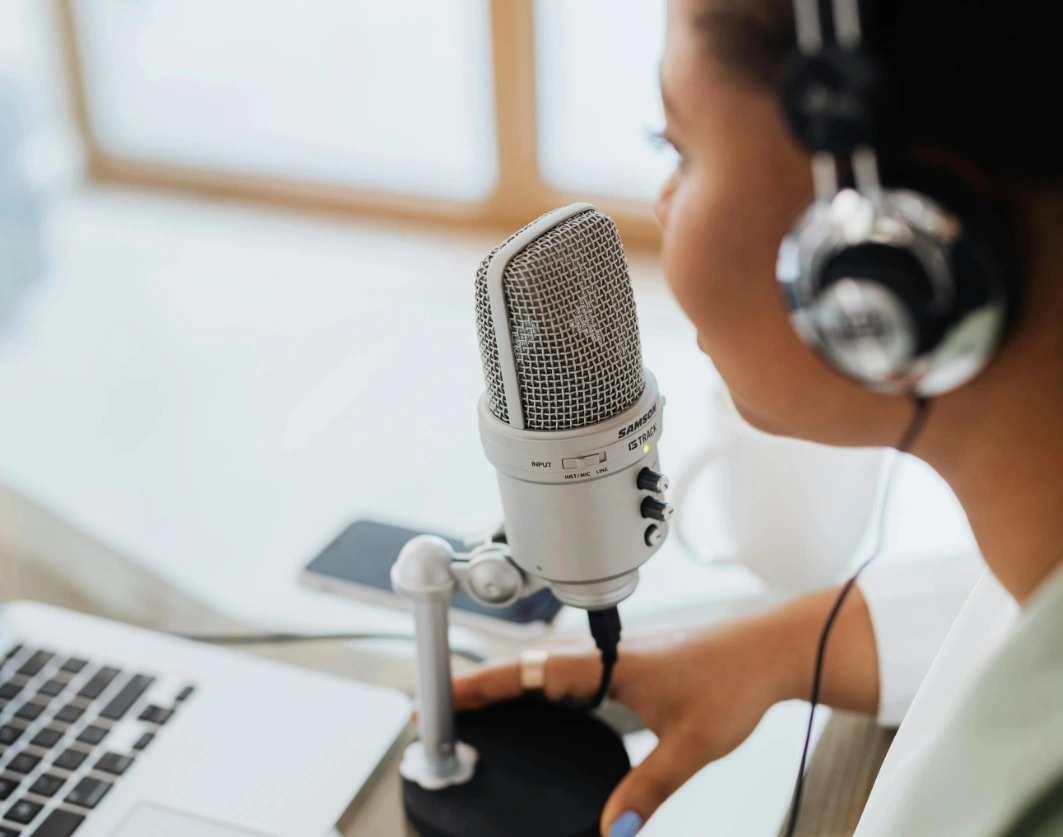
USB Microphone
A USB mic is a no-brainer. It is reasonably priced, works right out of the box, does not require any additional equipment—such as an audio interface, and it produces good results too. In short, this one is probably your best option, especially from a budget standpoint. Price Range: Rs 4,000/- [US $45] to about Rs 10,000. [US $115].
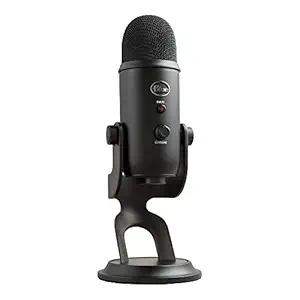
One the most widely used USB mics, and probably the highest recommended too.
A USB Condenser Mic, but slightly more
expensive in this segment.
Pop Filter/Pop Shield [A must have for your home studio!]
While doing voiceovers, sometimes words with certain letters can cause a gush of air or hissing into the microphone. For instance, the letters ‘p’, ‘t’, ‘k’ and ‘d’ cause something known as plosives, and ‘s’ and ‘z’ can cause hissing, which is known as sibilance. This results in an unpleasant blaring sound in the voiceover.
Although an experienced sound engineer is able to fix these to a great extent, as a best practice, it is always good to give the cleanest audio possible to the engineer to work with—it saves a ton of time and work for everyone!
This is where a pop filter/shield or a popper stopper comes in handy. With proper mic technique and a good pop filter, everything sounds just about right. And these are really inexpensive—a few hundred Indian rupees [under US $10].
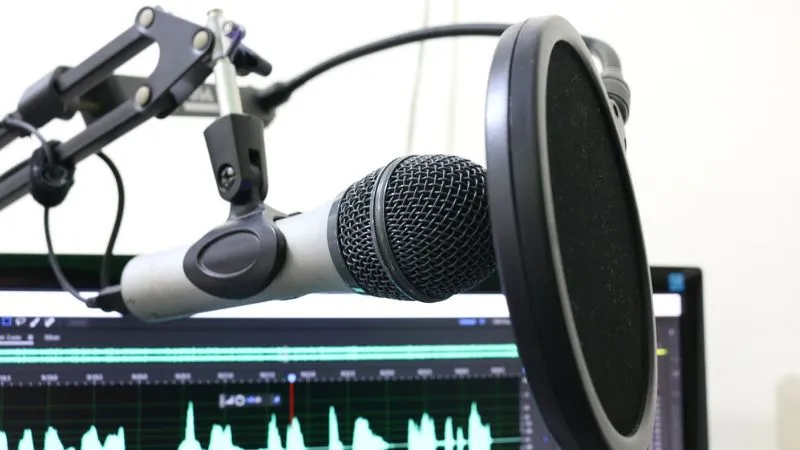
This is a common (and effective) setup used by podcasters and YouTube content creators.
Note: Using a smartphone mic adds another step, where you’ll have to record on the phone and transfer the audio file onto the PC for editing. It’s doable, but slightly more tedious.
Shock Mount
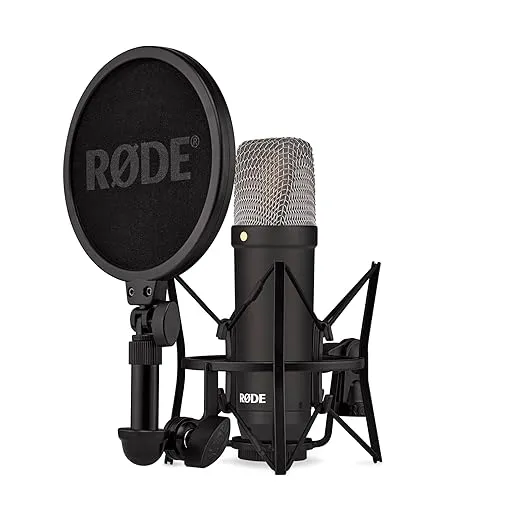
Condenser microphones are extremely sensitive to vibrations coming from your desk or floor. Therefore, it makes sense to install a shock mount to absorb these vibrations and avoid unwanted sounds distorting your clean takes. While they are inexpensive to buy, most mic bundles offer them as part of the package. For example, the RODE NT1A and the Focusrite Scarlett Packs are good options when it comes to value for money.
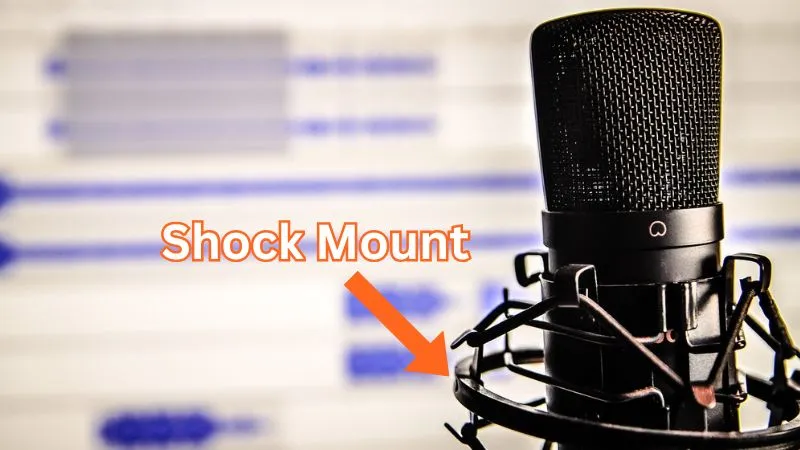
Dynamic mics are less sensitive, hence they usually don’t need one.
Microphone Stand [Again, a must have!]
From a stability standpoint, a floor stand is a must-have in my opinion, regardless of which mic or computer you use. Most VO artists do voiceovers while standing and usually not with a hand-held mic, which means you’ll either need a desk stand or a floor stand to hold the mic steady while you speak into it. Now, if you’re going to stand and speak, the only logical choice is a floor stand. They are quite reasonably priced, ranging anywhere between a few hundred rupees [under US $10] to around Rs 3000/- [US $35].
Headphones
For now, if you already have a pair of headphones, they’ll probably work! If you’re planning to buy a new pair, consider the over-the-ear [closed-ear] type of headphones [they are also referred to as circumaural recording and monitoring headsets]. The reason we use these headphones is that the sound from the headphones [background music] doesn’t ‘bleed’ into the microphone. Otherwise, from regular or on-ear headphones, the sound goes back into the mic, causing it to capture music, which spoils the recording. A good pair ranges anywhere between Rs 3500/- [US $40] to about Rs 6000/- [US $70]. Of course, there are high-end ones you can upgrade to in the future.
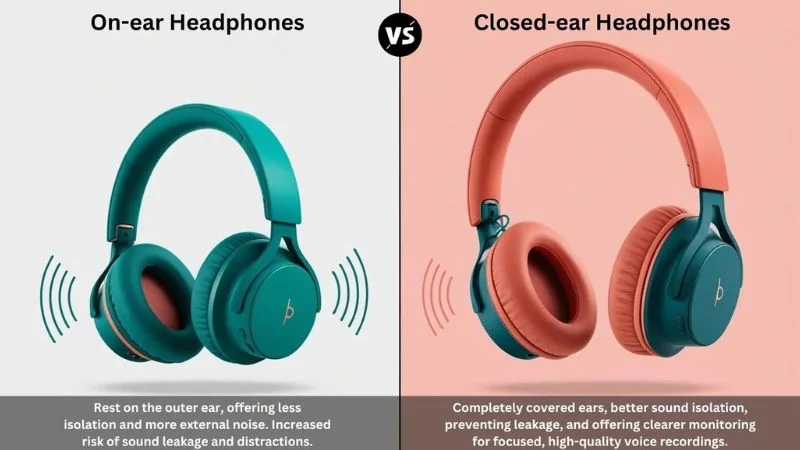

All three headphone options are well suited for voiceover and dubbing purposes.
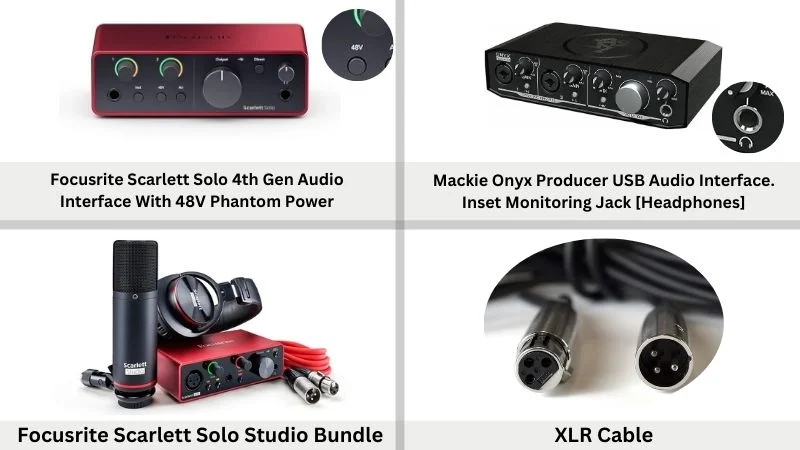
Audio Interface
The audio interface is referred to as an external sound card. This device helps connect your microphone or guitar/instruments to the computer. It is specifically useful for the condenser mic when you need extra gain.
A dynamic mic, even when connected to a sound card, does not require phantom power. Therefore, this feature must be kept powered off for dynamic mics. There is one exception, though: if you already own an industry-standard professional dynamic mic such as the Shure SM58 [for vocals] or SM57 [for instruments] and would like to use it, then couple it with a FetHead to use phantom power.
There’s a plethora of audio interfaces available for budget studios, especially voiceovers, podcasts, and YouTube channels. The good ones range anywhere between Rs 7000/- [US $80] to about 15,000/- [US $175].
What’s a FetHead?
Although designed for condenser mics, a FetHead is a preamp that helps amplify the sound of dynamic and ribbon microphones. Even though it leverages the phantom power to achieve this, the power does not go to the microphone, so the microphone remains safe.
Software / DAW
The software used for audio production is referred to as DAW, an abbreviation for Digital Audio Workstation. The DAW, or the software that you use, is, quite frankly, not as important as what you can do with it, at least initially. Let me explain!
For instance, there are audio narrators on Amazon ACX—an online marketplace for audiobook creators—who edit their work on Audacity and submit it as the final project. Some of them even teach recording voiceovers at home as a coaching business. If you’re starting out and need to get the hang of the whole recording, editing, and saving audio files, then Audacity is a great place to start. However, if you’re looking to go pro right away, then there are a few options to choose from. Here are a few examples:
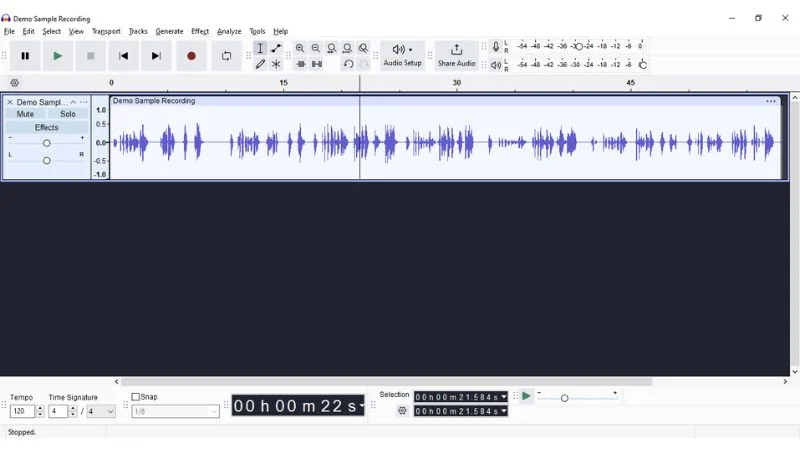
Audacity
A bare-bones basic audio editing software that lets you record and do some necessary editing that is good enough for vocals, podcasts and audio book narrations. It does not support video playback or dubbing features, but you can learn the initial editing techniques.
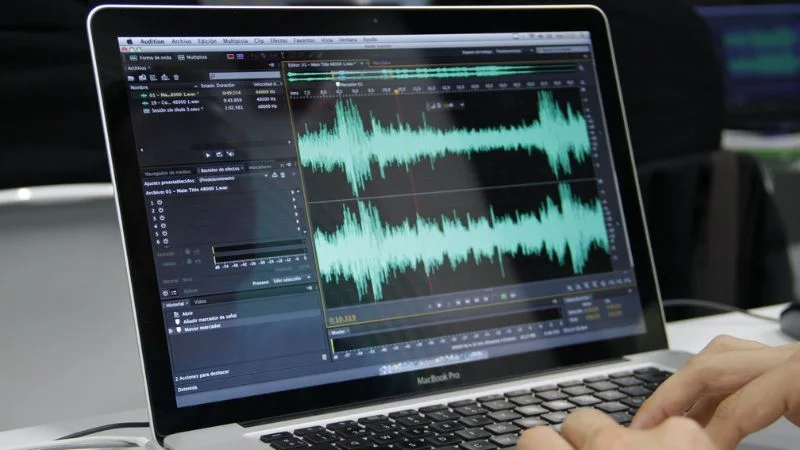
Adobe Audition
Adobe Audition is a paid software, more elaborate with features, and comes with a 7-day or 14-day free trial for individuals or businesses. It has video support but only for narrations, not for dubbing and lip sync.
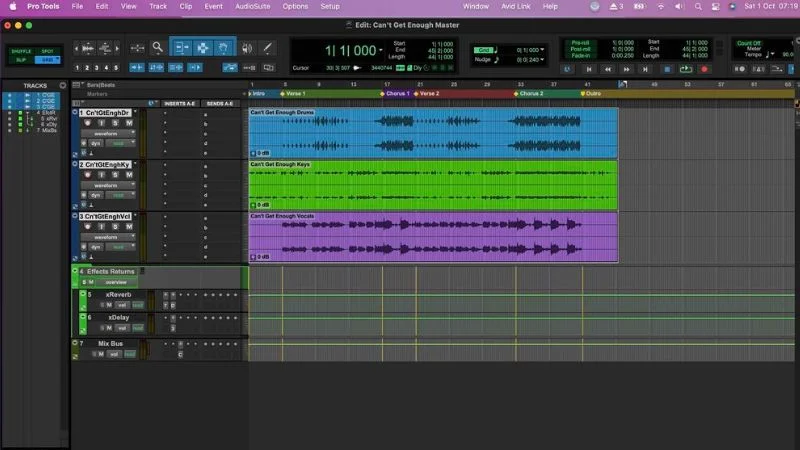
Avid Pro Tools
An industry standard, Pro Tools is a DAW that most professional audio engineers prefer working with, especially when it comes to music, VO, heavy video applications and dubbing. It does it all!
Finally, there are other options such as GarageBand and Logic Pro for Mac, Reaper (both platforms).
If you’re looking for an in-depth buying guide or a great reference as to which DAW to choose, there’s an elaborate article written by Cyberlink.com. In this article, they’ve listed their 12 Best Free Audio Editing Software for Beginners in 2025.
Click on the link below to check it out:
https://www.cyberlink.com/blog/the-top-audio-editors/453/free-audio-editing-software?srsltid=AfmBOopOgZpBu1AwExDNrsxjV4u8RaHfjdBuD4ndzLakMcEeYMaErQ5n
A quiet space [Most important of all]
It might seem cliché, but the space where you record will be the most important decision you will make (apart from a good mic, of course). If you want your voiceover to sound professional, a quiet place to record is a non-negotiable. A little caveat here, achieving high quality voiceovers from a home setup can be challenging, but putting in that little extra effort goes a long way!
Online on YouTube and on other blogs, there are guides on how to use your closet as a DIY sound booth. Actually speaking, it works!!
So if you have some extra moving blankets or duvets lying around the house, use them! Yes, this is a great place to start recording. It is budget-friendly, sounds natural, and prevents sound reflections from bouncing off of hard walls or surfaces.
In the next section, we’ll take a look at soundproofing and sound treatment options. Before we dive into that, let’s look at the table below. I’ve prepared this with both currency options, US dollars and rupees, and with links for your reference. These links are not affiliate links. Also, the options herein aren’t limited, there are tons of other options available out there. So consider this a ready reckoner!
Resources: Prices and Links
| Sr.No | Item | Amazon.com Price / Link | Amazon.in Price / Link |
|---|---|---|---|
| 1 | Condenser Mics A) RODE NT1 B) MXL 990 | US$159 US99.99 | Rs 18120 Rs 8990 |
| 2 | USB Mics A) Blue Yeti B) FIFINE K669B [Opt.1] C) FIFINE USB [Opt.2] | US$129.99 US$29.99 US$29.99 | Rs 10995 Rs 2370 Rs 2290 |
| 3 | Dynamic Mics A) Behringer Xm8500 [XLR] B) Samson Q2U [USB] | US$35.40 US$69.99 | Rs 2889 Rs 8999 |
| 4 | Audio Interface A) Scarlett Solo B) Mackie Onyx Producer | US$99.99 US$63.95 | Rs 14290 Rs 5499 |
| 5 | Moving Blankets [Dampening] | US$15.99 | Rs 1099 |
| 6 | Over-Ear Headphones A) AKG K52 B) Audio-Technica ATH-M20x C) Samson SR850 D) OnOdio Over-ear | US$79.88 US$49.00 US$39.90 US$37.99 | Rs 2539 Rs 4290 Rs 3199 Rs 2156 |
| 7 | DAW / Software A) Audacity B) Adobe Audition [Per Month] C) ProTools Artist [Anual] | FREE US$31.49 US$99.00 | FREE Rs 1834 Rs 8535 |
| 8 | Pop Filter / Shield | US$15.99 | Rs 299 |
| 9 | Mic Stand | US$19.44 | Rs 1199 |
| 10 | Acoustic Panels [18-pack] | US$24.99 | Rs 1395 |
| 11 | Audio FetHead | US$74.95 | Rs 9495 |
| 12 | Focusrite Scarlett Solo Studio | US$249.99 | Rs 25588 |
Basic VO Setup
[PC Not Inculded]
| Item | Price [INR] |
|---|---|
| USB Mic [FIFINE K669B] | Rs 2370/- |
| Headphones [AKG K52] | Rs 2539/- |
| Sound Blankets | Rs 1099/- |
| Mic Stand | Rs 1199/- |
| Pop Filter | Rs 299/- |
| Total Cost Of Setup | Rs 7506/- [US $90 aprx] |
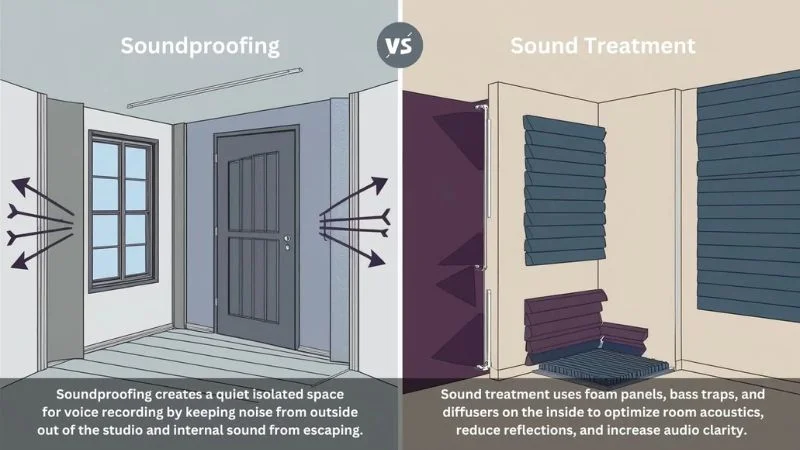
Difference between Soundproofing and Sound Treatment
When I first started researching the voiceovers and equipment space, I had no idea that soundproofing and sound treatment are two completely different concepts, but they are. And if you’re serious about achieving high-quality audio from your home voiceover setup, then this is something worth considering!
Soundproofing
Soundproofing is blocking the outside sound from entering the recording space. So we’re talking about heavy machinery on the road, lawnmowers, dogs barking, and neighbors partying—I’m sure you get the picture. Soundproofing involves changing the infrastructure of the recording space and is far more expensive. So if you can find a quiet space in the house/office. That’s sorted out!
Sound Treatment
Sound treatment is reducing the sound that bounces back into the microphone from the walls of the recording space, hence the use of blankets or duvets. So if you already have some duvets in the house, make use of them to block the reflections. You’ll be amazed at the results.
These two concepts are further divided into four primary methods, namely absorption, damping, decoupling, and filling gaps. If you’d like to dive deeper and understand “how to soundproof a home studio for recording”, check out this article by masterclass.com; it’s a 5-minute read.
Here’s the link: https://www.masterclass.com/articles/how-to-soundproof-a-home-studio#1fbFJ2O8ybSpoHKpliMCpz.
There’s another article by backstage.com which is worth reading to understand the implementation of soundproofing. Check it out:https://www.backstage.com/magazine/article/how-to-soundproof-a-room-guide-75172
It is crucial to focus on the sound treatment of the space you are recording in. The cleaner the sound in your mix, the easier it is to edit and process it. Once it records with distortions, removing them becomes extremely time-consuming and oftentimes impossible.
Common terms used in soundproofing and treatment solutions:
- Dampening blankets
- Acoustic Panels
- Acoustic Foam
- Studio Blankets
- Sound Absorption Blankets
- Sound Barrier Curtains
There are also sound isolation enclosures, also called sound booths, which are more expensive, but they come closest to professional studios in terms of recording quality. If you are at an advanced stage and wish to invest in custom and professional-grade soundproofing, then there are some industry pioneers listed below:
Resources
India
www.auralexchange.com
United States
https://whisperroom.com/
https://www.soundaway.com/Acoustic-Panels-Recording-Studio-s/58.htm
https://www.soundproofcow.com/
UK
https://www.soundproofingstore.co.uk/
Global
https://vocalboothtogo.com/
Amazon.com
If you are confused, just search for “Sound Absorption Blankets” on Amazon. From the result, select the “Soundproof Grommets” option. These are quite inexpensive and easy to set up.
The above-mentioned resources are just a handful; there are plenty of websites and local stores you will find. Simply type the keywords “home studio soundproofing” or “recording vocals at home” or something to that effect in Google (or any search engine), and you’ll find something. It’s that simple!
How to Connect Everything!
Step 1—Microphone
Dynamic and USB Mics
Most budget dynamic microphones come with a 6.5mm stereo pin, which is a larger version of the regular 3.5mm stereo pin (also referred to as a mini-jack or a 1/8-inch jack) you see on your earphones. Simply use a 6.35mm (big jack or 1/4 inch jack) adapter—available on Amazon, connect it to your computer’s microphone jack, and you’re good to go.
Some mics (slightly more expensive ones in this segment) are equipped with an XLR (eXternal Line Return) connector—an industry standard. If you wish to use this mic without an audio interface, there are XLR to 6.5mm cables available. However, the gain on these mics is extremely low, so the sound you get will need extra amplification. Connecting it is pretty much the same.
Condenser Mics
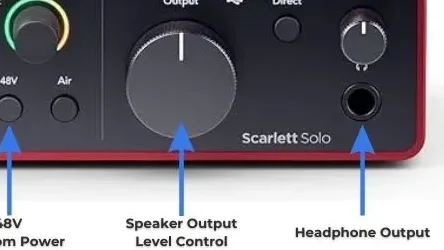
Condenser microphones have the XLR connector by default, wherein you are required to connect one end of the XLR cable to the microphone and the other end goes into the audio interface. The picture below explains the connectors and controls of a standard USB audio interface.
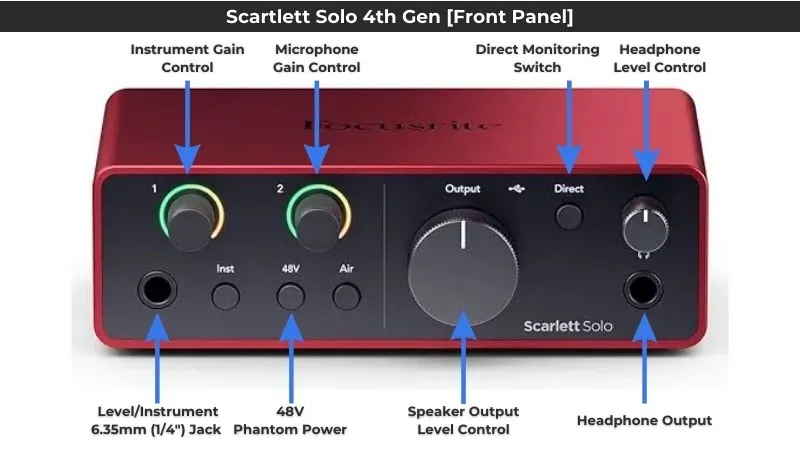
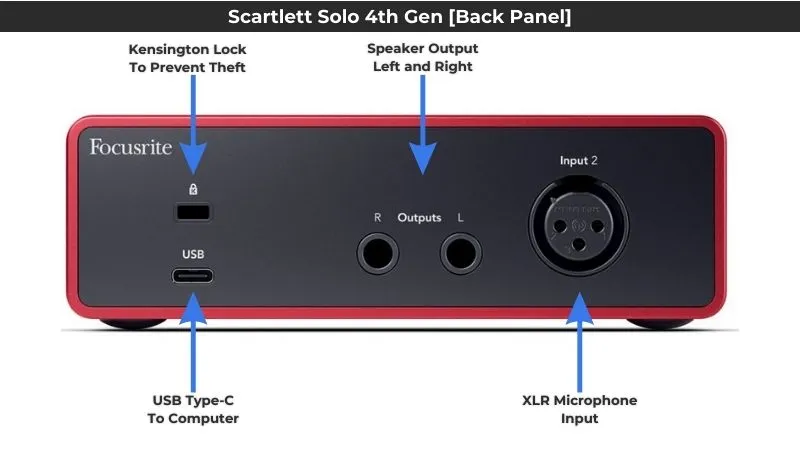
Step 2: Audio Interface
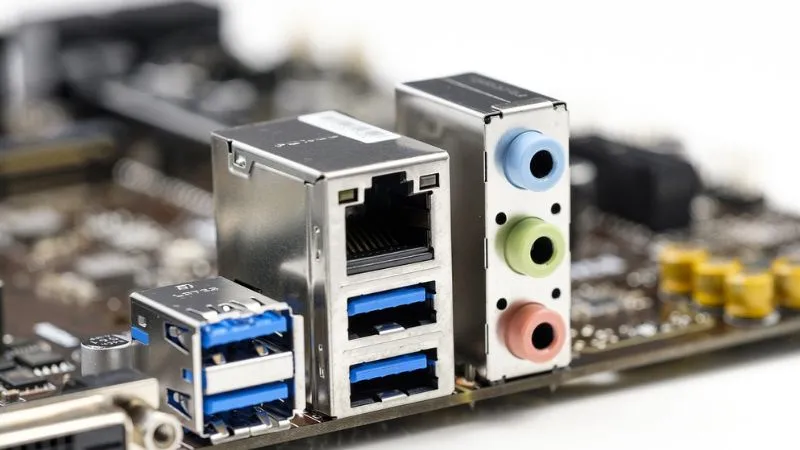
Assuming that you are using an XLR cable, the setup process is the same for both types of microphones. Once you’ve connected the microphone to the audio interface, connect the USB cable from the audio interface to the USB 3.0 port (blue color) on your computer. There’s usually one on the back panel of the desktop PC’s motherboard. Most laptops nowadays come with USB 3.0 ports.

with a dynamic microphone and a FetHead to amplify the gain.
Step 3—Software/DAW
Installing and configuring the software, or DAW, is fairly straightforward, but it also depends on which software you’ve chosen. For the purpose of this tutorial, we’ll use Audacity as an example, since it’s the simplest to install and use.
Download Audacity from the official website — https://www.audacityteam.org/download/
It is available for three operating systems: Windows, macOS, and Linux. Once downloaded, run the installation process and launch the application. Since it is open-source (FREE) software, there’s no need for registration.
“there are audio narrators on Amazon ACX—an online marketplace for audiobook creators—who edit their work on Audacity and submit it as the final project.”
Audacity: A few important settings
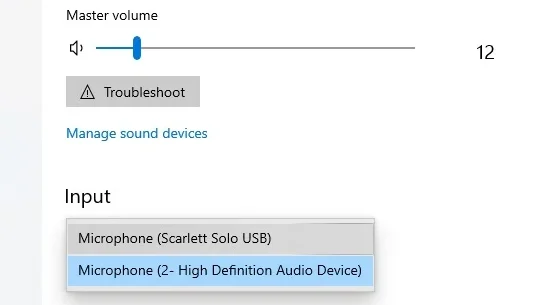

- Select the proper recording source from the drop-down menu. If you’re using an audio interface, then select that in this option or the microphone itself.
- Make sure all the connections are proper and the audio interface and microphone are switched on (some dynamic mics have a physical switch).
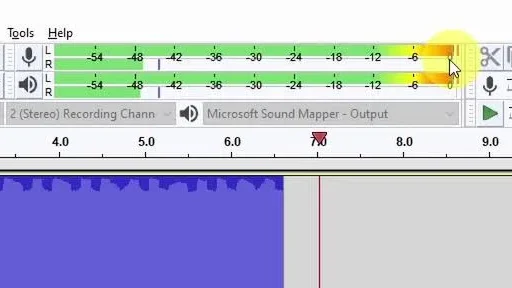
- Speak into the mic and monitor if the audio is peaking on the audio meter to the top right of the window. Red is too high, green is ideal, and at higher volumes (shouting, singing, etc.), orange is okay.
- If the audio signal is too high, use the gain knob on the audio interface to adjust the input. For dynamic mics without an audio interface, you can do that in the operating system’s sound settings, but the rest of the rules are the same.
- You are now ready to hit that record button and actually hear what your voice sounds like and test the levels in real time.
Step 4: Headphones
All audio interfaces have something called a monitoring jack where you plug in the 6.35mm pin from the headphones. This monitoring system comes with a volume knob, which lets you control the amount of audio received into the headphones. Use it to adjust while speaking into the mic. Even the on-board PC sound cards have a green-colored (3.5mm) audio jack right next to the mic input (pink/red). Using headphones is a must while recording to hear yourself talk, as using your regular speakers will cause interference with the recording.
Recap
Let’s put this section into three categories to make things simple. There are a number of caveats here when it comes to the overall quality and professionalism with respect to the audio quality.
Regardless of what level of experience you are at, let us focus on the following in this order:
— Upgrade your skills: proper mic technique, voiceover, and basic editing.
— Sound treatment
— Good condenser microphone
— DAW/Software
Beginner
If you are starting out and want to understand how an audio editing software works and want some basic recording, cutting, and editing skills in place, then Audacity is a great place to start with. At this stage we are assuming that you will be using a mic you already have or opting for a basic dynamic or lapel mic that plugs directly into the computer/laptop/smartphone [no audio interface].
Intermediate
Assuming that you’ve worked with microphones and basic editing before, Adobe Audition or Reaper would be a good upgrade. With this, it’s a good idea to opt in for an entry-level condenser microphone and audio interface. Check out the MXL mic and the M-Audio sound card.
Advanced
By now, it’s time to level up and get the basic professional gear capable of producing broadcast-quality audio. RODE makes world-class professional microphones that are affordable and are used in recording studios for voiceovers and dubs. If you’re ready to go even further [pro-level], then go for the Neumann mics—an industry standard for music production and vocalists around the world.
The same applies to audio interfaces; there are many mid- to high-end audio interfaces, but quite frankly, if voiceovers are your sole project, then even an entry-level audio interface will do.
Tip: Focus on the mic and the space where you record. Consider buying either some acoustic panels or sound-dampening blankets.
Credits & Thanks
I want to thank Sir François Castellino, my voiceover coach and mentor who guided me to find my voice. Thank you, sir! François Sir is a National Award-winning voice actor, singer, and TEDx speaker (2020), and a fantastic voice coach! If you’re looking for voice coaching, here’s his profile, François Castellino.
In addition to his VO training, we met Vrikpal Singh Khambay of Purple Haze Studio Pvt. Ltd. He gave us an insightful rundown on how to do voiceovers at home using the most basic equipment. This helped round out my understanding of the technical side.
A big thank you to Sir Aldrin Rodrigues of Plan A Studios, Mumbai, and to Mohit Yadav, our sound engineer for perfecting our voices—he has some magical editing skills.
Although much of what we’ve discussed today is based on my experience in media and technology, my voiceover knowledge is entirely due to the guidance of my mentor, François Sir, and his amazing team! Huge thanks to all of you, and I’m excited to keep learning and sharing more here on the blog!
Conclusion
In all the above options and scenarios, including the one with the best hi-tech equipment you may purchase or have, the overall voiceover quality will be limited to your ability and skill to record and edit/process audio optimally.
Therefore, our primary focus as voice artists is [in this order]:
1. Professional Voiceover Training [find a mentor/coach]
2. A quiet place to record [your closet is good enough]
3. A decent microphone [start with a smartphone handsfree or a USB mic ]
4. Basic audio editing skills [I learnt Audacity from Udemy.com]
If you’ve got value from this article, consider subscribing to my blog. I post content about technology, gear, and gadgets, and of course voiceovers! Also, share this post with your friends, YouTubers, and other content creators who can benefit from this article.
Talk to you soon!
Dushyant